Logitech has updated their Mevo line with some impressive professional options. Those options come with a price tag, though. The new Mevo Core is a small, cube-shaped camera that is trying to corner its way into the crowded streaming market.
Simple Design Hides Features
The unassuming cubic design hides its true potential. But don’t let its simplicity fool you; this little powerhouse is packing some serious power. With a Micro Four Thirds sensor, interchangeable lens support, and the ability to capture 4K video locally while streaming at 1080p, the Mevo Core is punching well above its weight class.
But here’s where things get really interesting: the Mevo Multicam app. This is where Logitech’s vision truly shines. The app transforms your smartphone or tablet into a mini production studio, allowing you to seamlessly switch between multiple Mevo Core cameras, add picture-in-picture effects, and even incorporate smartphone cameras into your setup. The app really is the “killer app:” of this line.
Mevo Core App
Logitech Mevo Core app
The real magic trick? The app’s ability to turn a single Mevo Core into multiple virtual cameras. By leveraging the 4K sensor, you can crop and pan within the frame, creating the illusion of multiple camera angles from a single static shot. It’s a feature that feels like it’s been plucked from the future, offering a level of flexibility that solo streamers have only dreamed of until now.
The app does this by connecting the cameras and app to a wireless network. Don’t have one? No problem. The cameras themselves can become a wireless hotspot that all the cameras, and app, connect to. You don’t really have to have access to a network for the system to work.
Worth the Investment
Innovation comes at a price; $1,000 to be exact, and that’s before you factor in lenses. It’s a significant investment, especially when compared to more traditional streaming setups. But for those who are serious about upping their streaming game, the Mevo Core offers a unique blend of professional-grade features and user-friendly design that’s hard to match.
Logitech Mevo Core
That lens part may seem like a negative. For those who are looking to increase the quality of their streams, it’s a bonus. You aren’t married to the built-in lens that just comes with whatever camera you buy. You get to choose. That’s the magic of Mevo Core. You can customize the quality of your shoot and stream.
Low-light performance could be better, and the image quality, while good, won’t outshine dedicated mirrorless cameras in the same price range. But that’s not really the idea. The Mevo Core isn’t trying to be the best camera — it’s trying to be the best streaming system. And in that regard, it’s a compelling system that could increase the quality for creators looking to level up their live productions.
Get your stream on
The Mevo Core is not without its flaws, but it represents a step forward in streaming technology. For those willing to invest, it offers a glimpse into the future of live content creation. 4 out of 5 stars.
The basic outline of my reviews are typically zero to five stars. And I simply don’t give 5 stars. That would indicate something is “the best” out there. The best is subjective as well as that target can move. However, the Theory Audio Design soundbar very well could make me change my mind.
Theory Audio Design (Theory) is the brainchild of Paul Hales, founder of Pro Audio Technology. The idea behind Theory was to make the high-end technology of PRO (which is typically installed in very high-end residential/private cinemas) accessible to a “wider audience” (i.e. for media rooms, bedrooms, backyards, distributed audio systems, and high-end commercial spaces).
The Albright home audio system is a basic head unit from Sony. We don’t have surround sound, ATMOS, or anything special. We will watch streaming more often than not, and live sports occasionally. For this review, though, I went the route of Billie Eilish’s Happier Than Ever.
This past summer I had the chance to visit Paul and the team at Pro Audio Technology and Theory Audio Design in southern California. The demo rooms there are among some of the best audio I’ve experienced. When the opportunity to experience this in my own home theater came up, I took them up on it quickly.
Now, understand this is not your typical home theater and surround sound system. The Theory home theater system centers around a soundbar and the loudspeaker controller. But, man, does it sing.
The PRO brand is not designed to be aesthetically pleasing; it’s designed to reproduce genuinely professional-grade sound. Often, PRO speakers are installed behind acoustic fabric. Theory loudspeakers, on the other hand, are meant to be seen, and feature premium aluminum construction finishes.
With that said, the speakers are built like tanks and about as heavy, but they definitely don’t look like pro equipment (which isn’t necessarily a bad thing). They are sleek and discreet – not some high-tech looking speaker array;
Get yourself some help to install your Theory system. In fact, hire some young people to do it for you. These suckers are HEAVY.
Theory Audio Design sb75 Soundbar
The sb75 soundbar is designed to fit perfectly under at 75” TV and they offer table top stands or a wall mount option. It utilizes six 5” carbon fiber low frequency drivers and three 1.4” polymer compression driver tweeters. Theory says the power is 200W per channel (AES method), with a 4-ohm impedance. The soundbar’s rated frequency bandwidth is 58 Hz to 23 kHz with a maximum output of 117 dB per channel. The sensitivity rating is 94 dB.
I told you they were heavy. The sb75 soundbar is 68 pounds with a couple of mounting options including on-wall. Dimensions are 9.5″ H x 66″ W x 3.8″ D. If you have a 65” or 85” TV, Theory offers two other soundbar models (sb65 and sb85) to fit those TV dimensions, respectively.
Theory Audio Design sb25 Multi-Use Speakers
The sb25 is essentially a single channel of the Theory soundbar, with the same specifications for the drivers and overall performance. You can mount it vertically or horizontally or even hang it from the ceiling with the optional Theory table top stands or universal mount adapters. It weighs 23 pounds and is 21.5″ H x 9.5″ W x 3.8″ D.
These don’t have to be used just as surrounds. A basic 2-channel, 2.1, or distributed audio sound system could be created with the sb25.
Theory Audio Design sub15 In-Room Subwoofer
As Ken Wilson used to say when calling St. Louis Blues games, “Oh Baby”. The sub15 is a 15” Theory driver featuring a 4” voice coil. The rated frequency bandwidth is 22 Hz to 125 Hz with 500W (AES) /1000 W (continuous) power handling.
Each sub15 passive subwoofer weighs 76 pounds and the cabinet measures 21.3” H x 23.5” W x 19.8” D. If the sub15 is too large for your space, there is also a smaller 12” subwoofer (sub12) available.
Setting up the sub15 was as easy as most other subwoofers of similar price. That’s not to say it’s easy. The ALC Automator software is intuitive and does walk you through the steps but knowing what you’re doing with audio systems generally will be helpful.
Controlling the audio – Theory Audio Design ALC-1809 Amplified Loudspeaker Controller
The center of the Theory Audio Design loudspeaker system is the ALC-1809 that ‘auto-magically’ sets the DSP of the Theory loudspeaker models that you have. Using Theory’s Automator software, the ALC sets audio levels, delays, EQ, and routing within the system. With 9 high power amplifier channels, 8 balanced audio inputs, and 32-bit/96kHz DSP processing the ALC-1809 gives you plenty of power.
In addition to the power, the ALC has 8×8 matrix bass-management, 8×8 matrix mixing, 160 parametric EQ’s (20 per channel), and internal band-limited and full band pink noise and sources, and up 75msec of delay per channel. It weighs 13lbs and fits into a single rack unit.
Plug and Play Surround Setup
Theory Audio Design Software
Get yourself a PC (not a Mac) and tape measure. That’s all you need to run the Automator software and setup the system. You simply measure the distance from each speaker to the closest walls and the ideal listening position. Using the software you select the speaker layout, products, and the appropriate measurements, apply the settings, and away you go.
From the first note to the last the Theory Audio Design system hummed and thumped. This was an entirely different experience than what I heard in their offices. This was MY home, and MY TV. And did it ever sing. The sub15 subwoofers brought the depth you’d expect. The speakers and separation were clear and powerful. It was the closest my system has ever sounded to profession-grade.
It wasn’t just the lilting of Eilish’s voice, it was the reserved power behind the speakers. It’s as if you could tell they could get loud if they wanted, but they were holding something in reserve so as not to overwhelm you.
Your low end is the foundation of the system and sound; not just the rumble in your tummy. The sub15 is one of the best home theater subs I have ever heard. Better than anything from SVS, Sony, or others. It was clean, clear, and powerful.
Hales background is a combination of a hifi and pro audio. That’s his roots and his history. He’s been around the block once or twice when it comes to producing serious audio systems and components. That legacy comes through in the Theory Audio Design system.
After the credits rolled on Happier Than Ever I went through the gammet of genres. From Avengers to Ozark. Each one brought with it a nuance I’d not expected. As a final test I watched two separate NFL playoff games. This may have spoiled me for the rest of my life. The sound quality and impact of this sound was unmatched with anything I’d experienced to date.
The Bottom Line
The Theory Audio Design system is the best home theater audio I have heard to date. That’s not to say it’s the best in the world, it’s the best ever, or it’s the grandest of all time. But it is by far the best audio I have ever experienced in my home. It’s clear, pristine sound is powered by a beefy processor and amplifier in the background.
The only drawback is the price. The 5.2 system I received would run about $12,450 – but keep in mind that includes all of the amplification and DSP. For someone who enjoys being immersed in music, movies, and sports, and can afford that lift, I can say with confidence you should get a Theory system installed. For the rest of us, get a friend who has one and just go to their house to enjoy.
AtlasIED Improves Their Atmosphere – Firmware Version 2
AtlasIED Improves Their Atmosphere – Firmware Version 2.0
In the spring of 2021, I was asked to evaluate firmware version 2.0 for AtlasIED’s Atmosphere DSP engine. AVNation was involved in the launch of the new digital audio platform. Knowing many of the people involved in creating a new ecosystem that combines digital audio processors, amplifiers, graphical user interfaces, programming software with touchless control and AI I was intrigued.
I have been loaned a small Atmosphere system to work. I have previously supplied comments to the AtlasIED team about the features that were great, and some missing features that could improve the use and applications of the platform. When version 2.0 of the firmware was being developed, I was given a preview of the software and saw that many of the comments I had made were implemented as well as other additions that other parties have suggested.. Now that it has been released publicly, I can release my finding publicly. This review is going to focus on the Atmosphere AZM8 signal processor and its accessories that all have been given new firmware. The Atmosphere system exposes its technology where it is appropriate but also hides some of the options from end users. This allows for a user to concentrate on the project and not the technology being used to create it. It allows for the focus to be on the tasks, not how to do the tasks. It also uses networking for control, but not for audio transport which is a key point.
The Basics
This product is designed for the commercial audio market. The end user will typically be non-technical, the interfaces have been designed to work with their needs. One can easily use this product family in schools, restaurants, retails, and business environments. It has a good robust feature set for those markets. The DSP engine has ten mono summed inputs on the unit, with the ability to add up to four expansion inputs through accessories. These external inputs are summed to mono as well. Under the new firmware it is possible to treat the internal inputs as stereo pairs; how inputs are ganged is at the integrator’s discretion. There are eight mono outputs on the unit, with no expansion options through the accessories. The same ganging of controls can be done to create stereo pairs or stereo with subwoofer.
Again, it’s important to note that this product is designed for the commercial market. The hardware is not designed to do everything. It is designed to work in the commercial market well. It has a feature set aimed for this market and its segments. It works well in a restaurant, but it might not be the right solution for a restaurant in a stadium that is part of a larger network (although could be integrated as such for specialty uses). The Atmosphere product is a good solution for the K-12 education markets and manufacturing environments. I know that this sounds strange at first, but the importance of tones or bells to indicate the start and stop of periods is important for both. The ability to zone the bells to specific areas allows for the separation of bells by grades or production lines.
The 2.0 Updates
The addition of room combining in firmware version 2.0 for the Atmosphere DSP has enhanced its functionality for the hospitality markets. For restaurants, bars, and ballrooms the ability to easily adapt to the current needs or configurations is important. Through the use of the General-Purpose Input and Outputs (GPIO) on the unit, it is possible for the integrator to define how the system reacts to airwalls or dividers being used. This ability improves the end-user’s experience by removing one more task from their processes. For a simple presentation space with a laptop and projector, being able to connect via Bluetooth™ using the Remote Bluetooth Audio Input (A-BT) accessory to the audio system offers ease of connection while reducing the trip hazard. One could also use the RCA/3.5MM Audio Input(A-RCA) to use a wired connection. If a more complex connection is needed, it is still possible to install an input panel that is wired to the Mic/Line inputs of the Atmosphere DSP.
The stereo and subwoofer features that have been added through firmware version 2.0 works well. It does require that the person configuring the system set the stereo pairs and use during the input definition, not during the output process. It works as one would expect to have the system provide a seamless routing of the stereo signal through the system. AtlasIED did a good job reacting to the requests from the marketplace through the changes to the firmware and software interface it is important to remember that no changes have been made to the hardware. This approach has been used by other companies for decades, the first time I remember seeing it was in the later 1990’s when crossovers were available as 2×2 or 1×4 the only difference being the interface. It is a practical solution to the request.
The Atmosphere system does not require the use of specific software. It is configured through a web browser; it immediately becomes compatible with any graphical operating system which is nice. The manual does a good job of pointing out that Safari and Chrome are the preferred browsers. The unit has multiple ways to connect, there is an Ethernet connection via a hardwired RJ-45 as well as two Wi-Fi options, join an existing network or become a standalone network. In both cases the IP address is displayed on the front display. I recommend using a hardwired connection for firmware updates. When the firmware is done being updated the unit reboots, which causes the network to disconnect and at times the computer does not auto reconnect based on user settings. Also loading audio files is much faster via wired connections. It is advisable to set a static address for the unit as this will make some of the features much easier to use. The practice of using static IP addresses for ease of control is not limited to Atmosphere products it is helpful for many products.
The GUI and Navigation
Navigating through the interface is intuitive, one simply starts at the top left and works through to the lower right making selections as needed. The system does have a fixed architecture but routing paths through the DSP is adjustable. Some people refer to the approach used as Tic-Tac-Toe style. A key thing to be mindful of is that there is no offline mode or working disconnected from the unit. Changes are made in real time. If you are not careful you can send high level signal into your system and scare yourself; don’t ask me how I know, I just know. IFKYK
After working through the software, I found outlining the paths and rules ahead will save both time and frustration. The proliferation of open or drag and drop architecture in DSP has caused a certain amount of final routing be configured in the field. That is possible to do with fixed architecture, however the speed gained by defining inputs, outputs, routing, and priority levels speeds up the process quite a bit.
The Many Accessories
A feature that sets Atmosphere apart from other commercial processors is the ability to extend functionality through external accessories. Typically, the accessories in this price range are control interfaces only. Atmosphere has three different categories of accessories: control, monitoring, and audio input. These accessories range from Bluetooth interfaces to Ambient Noise Sensors to Volume Controls. These devices are the connective items that make the solution user friendly. Many of the interfaces are available in other user’s products but not as easily. That is not to say that these are perfect, there are some limitations to the products that must be considered. There is a limit of one audio device, “A Series”, accessory per accessory chain. Working through use cases the restriction did cause some design changes. I had configured a restaurant with a meeting room. They would want to have both an XLR input and a line level RCA/3.5mm input panel. That would be two on a single accessory loop if they were wired serially. If one were to run a home run to each panel the system would function. It is a limitation, but not an impediment.
The Easy Ambient Noise Sensing Technology
The Ambient Noise Sensor (X-ANS) accessory is one of the easiest ambient noise sensors I have used. The ability to allow the unit to do an auto adjustment as a quick start is very useful. Typically, there is more setup needed by setting the target, the threshold, the range of impact, attack and release time… etc. This one I simply turned on the “Auto Mode” and the unit determined the target level based on the adjustments I made to the zone level control. I used a self-powered speaker to playback restaurant ambience in my lab. After about ten minutes of making changes to the ambiance and adjusting the output level of the zone I was testing I could see the Atmosphere starting to make predictions. This system learning can only be done with acoustic energy in the room, in other words one cannot just send a signal into an input to hopefully simulate the experience. On a side note, if you have not taken a look at mynoise.net, it is a great tool to use for setting up various audio systems as it allows one to create the ambience of the space even if people aren’t there. I have used it to setup noise masking systems as well with good success.
The connection of the remote accessories was easy and quick using Category 5E or better cable and 8P8C connectors (the male RJ-45 connector). The warning in the manual of not using premade cables when trying to install panels in electrical boxes was one, I had not seen before. After trying it, the recommendation is based on the size of the strain relief boot on most premade cables. Pointing out that fact is something most manufacturers do not do, and it is something to be heeded. I tried and it would not work as they indicated. There are other things that are done to make the process smoother than other products. Using the same size removable barrier block, also known as Euro block or Phoenix Connector, for all the AZM including the general-purpose input output (GPIO) allowed for less tool changes.
The Controllers
There is a control accessory that sets itself apart for me. The Atmosphere AZM products have a web server in it that also serves up control interfaces via webpages with no coding required. The pages are designed to work on mobile or handheld devices but also functions well on other size displays. Not only can these web pages automatically mirror the wall controllers, one can also easily create unique virtual controllers easily in the software. The integration that this feature enables cannot be overlooked. This allows the system to be controlled from many point-of-sale solutions in restaurant and retail spaces using browser-based interfaces. Now instead of having to worry about the accessibility to controls in dining areas in a restaurant, the controls can be placed into the point of sale. Below are some examples I quickly created using the web interface of the Atmosphere. The control interfaces basically create themselves based on the configuration of the hardware.
The zone selector and virtual controllers can have access restricted by using a four-digit code. If more security is desired, it can be deployed through the IT infrastructure. Using some basic settings in a router I was able to make it so that AZM was only available through a hardwire connection and only through certain devices by MAC address filtering. This level of access is not unique to AtlasIED, but it is something to be aware of with how easily one can control the entire system from web browsers and not use wall controllers at all.
The Message Playback
Having one gigabyte of storage available for message playback is a unique feature in this market. As I was contemplating use cases, the benefits started to become visible. For a bar, have a prerecorded message that is scheduled to indicate last call takes the burden off the staff and makes sure it is played each day. Adding in that it can be triggered manually allows the staff to still play the message when closing early. For schools the ability to play the “fight song” directly from the Atmosphere avoids the challenges of not having a copy of it available.
There are also things that are personal preference. Within the equalizer pages I would like to be able to see all the filter frequencies at once, not solely as a graph but values. I also wonder if the use of Q instead of octaves for filter width will confuse some users. I do like the automatic or self-heal feature for the accessories. During testing in my lab, I could replace and move accessories without an issue and the system just worked. The idea of being able to just send a wall controller to a customer and have them replace it as it is just connecting an RJ45 to an 8P8C can be a huge cost and frustration saver.
Comparisons
Feature
AtlasIED
Atmosphere
dbx
ZonePro 1260
Symetrix
Zonemix 761
QS
MP-M80
Inputs
10 plus accessory input
for a total of 14
12
12
16
Outputs
8
6
6
8
Configuration
Browser
Safari or Chrome
Software for Windows
Software for Windows
Software for iOS/Android tablets, Windows and Mac OS
Features
(from product website)
4 accessory ports
App-less web based virtual wall controller
Bell Scheduler
Integrated message player
Room combine and groups
Mono, stereo, and subwoofer support
Auto noise compensation
On board WIFI
Large library of AtlasIED speaker presets
Accessory self-heal
High Priority GPI input
Wide selection of audio DSP objects
Advanced Feedback Suppression (AFS™)
Autowarmth®
Auto Gain Control
Compression
Limiting
Noise Gating
Notch Filtering
Bandpass and Crossover Filters
Parametric EQ
Security Lockout
Wall Panel Control
RS-232 Control
Input and Output Gain
Highpass Filtering
Parametric Equalization
Compression
Limiting
Automatic Gain Control
Ducking
Feedback Elimination
Signal Routing
Delay
Polarity
Overall, the Atmosphere platform is a system I would recommend considering for projects. The product is well designed for the commercial market and will easily meet typical needs. The main features that make me consider this product over some of the others are message playback, easy ambient noise compensation, the web-based control panels, and the zoning system. The available accessories, such as Ambient Noise Sensors, are the items that turn this product from a signal processor into a system solution.
Bradford Benn is the founder of Advisist Group, LLC as well as being a member of the AVNationEditorial Advisory Board and Director Ermirtus of AVNation.You can find out more about him on LinkedIn or at the Advisist website.
One challenge audiovisual designers run into is sending HD video over long distances. There are solutions that convert the signal into IT bits and send it over the network. Proprietary systems transport HD signals along various means. Vanco aims to send HD video over a vast expanse using fiber with their EVEXFBRK1.
Vanco fiber extenders deliver long-distance video and audio transmission without the loss of bandwidth or quality. Unlike when using copper cabling, fiber optic cables are immune to electromagnetic interference (EMI) that may be caused by power lines, electrical appliances, fluorescent lamps etc., which can cause poor picture clarity and sound distortion.
Unboxing HD Fiber EVEXFBRK1
Upon opening the box, the transmitter and receivers are both the same size and footprint. This makes it easy to install. The fiber optic cables are supplied in a spool with the fiber already terminated on one end and an SFP port on the other, which will plug right into your device.
The Vanco fiber extenders were tested against both copper cable services from other extenders. The setup was quite easy. The transmitter has easy-to-understand ports as well as dip switches to change the type of control passthrough.
In reality, what we are doing is using the multimode fiber to extend HD video by almost 1,000 feet. There is no networking, VPNs, or subnets to mess with. This is much better than copper cable connections for the quality of audio/video performance.
The video quality is pristine. There was no loss. We tested up to UHD, but not full 4K. At both UHD and HD the picture was great. The Vanco EVEXFBRK1 video conversion is perfect enough for the naked eye. We did not put it into an analyzer. The KVM aspect of this extender was also impressive. The latency was basically undetectable. The test consisted of both mouse and keyboard signals going over the fiber extender.
The downside of the devices really is just a design consideration. With transmitter/receivers such as these, having the inputs and outputs on opposite sides is a bit inconvenient. The USB, RS-232, and fiber connections are on one side. HDMI, as well as IR and power, are on the opposite side of the device.
I would recommend this fiber extender for those who need to extend the distance of an HDMI and RS-232 signal. The device can be used as a KVM switch, too, which is a great asset.
The fiber extender is not quite as easy to use as a HDMI cable, but if you need that distance and don’t mind installing the device in an area where it’s handy for both ends of the signal, this fiber extension could be your solution.
As someone who used to live in control programming spaces all day, getting into a new system always took a minute. We need to come up with a universal “you are here” point in control systems. Even for configurating systems. The same was true when I entered the Kramer control interface. Once I got into the system and started in the main area, called Manager, I was off to the races.
I’ve programmed systems with logic flow, writing code, and configurating. Kramer control falls into the configurating column. That doesn’t make it automatically good or bad. Just understanding the requirements before starting is helpful.
For the purposes of this review and demo I deployed three Kramer SL-240C units into various offices here at AVNation. In those offices we had an Epson PLE20 as well as Sony BluRay players. That way I could test both RS-232 as well as IR control. One of the Epson projectors we also controlled via IP.
Building Project
Putting together the control project was simple and straightforward; once you figured out where everything was. In order to start putting the parts and pieces you have to launch “Builder” from the Manager interface. For me, it wasn’t an intuitive experience. Now, one caveat. I did NOT read the manual. At all. The only time I referenced the manual was when I really could not figure out a particular part. Had I RTFM first, it may have gone a bit easier. And, if you don’t know what RTFM means, call your favorite tech support and ask.
Once inside Builder, the going was easy. Both the projector and player drivers were available. According to Kramer, had they not been available it would take anywhere from 2 days to possibly a week to get one built. An aspect I appreciate in configurator systems is the option to build your own drivers. Kramer control has this. When you add a device you can choose to add your own. This will take you to a Device Driver builder. It’s a nice addition. The Device Driver builder puts Kramer on a professional standing as opposed to other configurators who don’t give you that option.
Once the “room” was outfitted with devices I went to create the user interface. Creating the user interface is the one area that drove me to the manual. Developing pages inside Kramer control was not intuitive for me personally. In addition, there are limitations in the overall look and feel. I did use the stock graphics. I would recommend creating your own backgrounds, graphics, and buttons and importing them. Making your own will give you a bit more control and creativity.
An aspect of Kramer control that I’ve only experienced one other time is the copying of completed rooms. You can select an entire “Space” and copy the entire project to a new Space. Once my original room was done I copied it to the other two rooms, adjusting the code for one of the projectors to be controlled over IP. In addition to copying a room you can also make a reference system. The reference system is more than a copy. It’s a copy that continually references the master. In that way, you only have to make one change then all the, classrooms for example, are updated with the new code.
Rollout Kramer Control
Kramer control is an IP-based system. The brains were connected to the network and then their individual devices. We did not have a touch panel to control the systems so I launched the computer/web interface. The systems worked consistently well over the course of three days. We powered on and off both projectors and players and created global shutdowns at the end of the day. The ability to control the other rooms from one location was a nice benefit for this test. However, it’s something I would be careful of for large deployments. It’s unwise to give the professor in one lecture hall control over someone else’s room technology.
Another part of the cloud-based system of Kramer control was the configurator. I hesitate to call it the software because at no time did I download a program. All of the work was done on the Kramer website. Kramer says they prefer Chrome browsers but will also support Firefox. This means a few things. The first is that I can use a Mac (my preference), PC, Chromebook, or Linux machine. It doesn’t matter the hardware as the service lives in the cloud. The second part is the continual backing up of the program. Backing up to the cloud ensures you don’t lose any work. Finally, someone can come up behind you and finish the job without needing your computer. If the files live in the cloud then your co-workers can get access.
The cloud based approach is a new one for me. There are half dozen other control systems I’ve used and programmed or configured. Leveraging the cloud to not only store but also program within is an advantage. There is no software to keep updated, and a team of programmers can work remotely on the same project. In addition, you don’t have to send a team of techs to a job site. During COVID especially, this is important for keeping your clients and employees safe.
Overall review of control platform
As a programmer, the configuration space was straightforward and relatively simple to get comfortable. What wasn’t intuitive I could look up in the manual. As an integrator, the cost is competitive for the hardware and you will certainly save on the costs of programming time. Kramer has several deployments you can talk with to get a sense of how the system holds up over months of use. Kramer control should certainly be in your toolbox of control options.
Looking at Beale Street Audio’s first in-room subwoofers
Going from a simple home theater receiver with a couple of speakers to either a surround sound or adding bass is a big decision. The size and shape of your space comes into play as does the power of your bass unit. Bringing the new Beale Street Audio subwoofers into our living room was an education in warmth and overpowering.
First the setup. Our living room is shallow and wide. Measuring at 14 foot by 10 foot (roughly 4×3 meters), it’s an odd setup. Technically we could turn the system to where it would be longer, but then the TV would be backed up by a patio door and that would just be weird. So, here we are; 14×10. Ok.
The unit I have powering our system is a Sony 7.1 receiver, but I currently am only using them for stereo. Again, 14×10 space and not sure I want to mess with the work to tweak a surround sound or ATMOS system. But adding a subwoofer to the space would be a nice addition. The two subs we tested were the Beale Street BPS-65 and BPS-80.
First the connections. The last few receivers I’ve had only provided passive bass outputs. This Sony is no different. Regardless of what sub we put in this space, it had to be active. Thankfully this line of Beale Street subs are indeed active speakers. The connection points are incredibly versatile. You have the option of connecting mono or stereo RCA or speaker-level in from an existing amplifier unit. The speaker-level input also gives you a passthrough option.
The subs give you the ability to adjust the crossover for the system and control the phase. The phase adjustment would make sure the subs were in alignment with the main speakers of the system.
Audio Performance
So this is where we get into how these Beale Street subwoofers sound. In general I am a fan of Beale Street Audio. Their patented Sonic Vortex technology produces incredible sound from small form factors. I should have thought of this before I powered on the BPS-80. See, the “80” stands for 8-inch woofer. In our 14×10-foot space, it was a lot of bass. It wasn’t overpowering, but it was close. Once I got the sub in the right position and system tuned, the 80 sounded great but I was only running it at about a 3-4 on a scale of 10. It’s clear this model is capable of taking on larger spaces.
The BPS-65 (6.5” woofer) was a much better fit for our space. It had an immediate smoothness and authority to it in our room right out of the box, and all from a tiny 6.5” driver – awesome. Once I got the BPS-80 tuned in right, the performance of the low end was noticeably the same as the BPS-65. Both subs were able to fill the room with deep, tight bass without being overbearing. No one was home at the time of this demonstration so I was able to make it “thump” and that was fun for a few minutes… until my wife’s curio cabinet started to shake and I stopped.
Wrap-em Up
As we get into the holiday season and your customers, and you, start looking at ways to outfit your home theater giving the Beale Street BPS-80 and BPS-65 a try would do you good. The form factors are shockingly small for the power they provide. The professional adjustments give integrators the freedom to tweak and adjust them for any size space. Overall, these are a great set of subwoofers that you’d do well to put in just about any theater, living room, or home office, regardless of size.
My first control programming class was in the mid-2000’s. It
was here that the joys of IR, 232, relay, and IP control was doled out. The
knowledge was used to design, program, and deploy countless classrooms,
conference rooms, and houses of worship. Never once did it occur to me to put a
system into my home.
That’s not entirely true. It crossed my mind. The systems I worked with primarily were not wholly cost prohibitive, but they were a bit out of my price range. When Control4 sent out the newly imagined Neeo Remote it was the first time I considered a system for the house.
The system at my home is a step above most. There is a
Pioneer head unit that acts as amplifier and HDMI switcher. The sources are
Xbox, Apple TV, and BluRay player. These go through the Pioneer and into a
Sharp TV. With those components you are looking at five remotes. It’s a system
that the family has gotten used to yet complains about the complexity on the
regular.
After talking with a local Control4 dealer friend, I
purchased the Control4 EA-1. The EA-1 has four IR outputs, HDMI, IP, and
Zigbee. There are no Zigbee devices in the system, so we’ll ignore that for
now. If you were paying attention, I mentioned five devices to control but only
four IR ports. We leveraged the IP control for the Sharp TV.
Thoughtful Integrations programmed the EA-1 but left me the
Neeo to add to the system myself. Here’s where the simplicity of the Neeo
remote and Control4 ecosystem come into play. I never once opened a graphics
program to create an interface for the Neeo. The system automatically created
and populated the controller. It was seamless.
In the past, it would have been an additional couple of hours as the graphics had to be created. There are some things that would have been nice to tweak on the Neeo but those are minor details compared to the ease and intuitiveness of interface that was created.
Adding Neeo to the system was simple. Following the prompts
to connect the remote to the Wi-Fi, the device takes it from there. After Neeo
was on the network it looked for a controller and communicated.
The Neeo is a hefty remote with an intuitive screen. The buttons are responsive and mostly in the right places. Again, there are minor adjustments I would have made but can’t argue too much. If you have a fully integrated audio, video, and lighting control system Neeo will populate those controls as well. We do not, as of yet, have those. You can populate “favorites” for television, radio, and audio/music channels to the room screen, and you can easily swipe between about as many favorites as you want. And the best thing is that me and my family can easily rearrange the favorites all on our own, no dealer required.
Overall, this is one of the best handheld remotes I have
encountered. The weight gives it substance, so you understand you have the
control of the entire house in your hand. The Neeo battery life is surprisingly
long. We have kept it off the charger for over four days with no issues.
With ease of configuration, weight of controller, intuitive
interface, and battery life, this is a formidable remote control. If you have a
Control4 system this is the main remote you want for your living or family
room. The Neeo will be the remote you use the most for the foreseeable future.
My home is slowly turning into a lab of sorts. We’ve
recently purchased a home automation control system in order to review a new
remote. That will come out shortly. While the control system process was
happening a package from Vanco International showed up at the AVNation offices.
The Vanco Spot for Dot along with Beale Street Audio ceiling speakers. After
some discussion, and assurances to my wife, the system was installed.
Out of the box
Upon first glance the Spot for Dot (SFD) is a simple
concept. It’s a mount for an Amazon Echo Dot. SFD provides audio to passive
(not powered) speakers and gives a room the ability to take Echo audio and
distribute to the room at a higher quality and volume than the installed
speaker can deliver.
The process to get there is a bit more involved than what I
thought. You are making a cable and electric run with the possibility of a
second cable run. That one’s up to you and we’ll get there.
Power Up
The Spot for Dot requires power. That maybe should have been
self-evident to me. It probably is to you. However, in my head I assumed we
would just plug the Echo Dot into the wall and run the power cable down the
wall. It would have been ugly, but that’s my vision. Fortunately the team at
Vanco did not have my same limited imagination. In order to power the Dot and
speakers you, or your licensed electrician, will run a 120 volt power line to
the Spot for Dot. This is hardwired into the SFD. The SFD then powers the Echo
Dot. The current iteration of SFD requires you to use either a generation 2
Echo Dot or an Echo Input. These are the devices with micro-USB connectors.
Vanco will most likely release an upgrade kit for 3rd Generation
Echo Dots or an entirely new Spot for Dot. At the time of this writing they do
not have an “official word” on either. We opted for getting a Gen 2 Dot.
Spot for Dot installed
Let there be Audio
This isn’t a review for the Beale Street speakers. I have personally been a fan of these speakers for over five years. Let me just say, they sound really incredible when paired to the Spot for Dot system. Once the speakers were installed the cable run was made connecting the pair of Beale Street speakers to the SFD. Power and speaker connections. It was that simple. The sound was incredible, and the overall volume was more than enough for the 15 x 20 living room we installed them in.
The optional other cable run is an auxiliary connection you
have the option of making. In some rooms that could be from the television or
an MP3 connection. We choose not to add that connection.
In Short
If you, or your clients, are looking to upgrade the audio
for their Echo ecosystem, the Vanco Spot for Dot is a great option. The SFD is
also a good option for adding whole room audio to common spaces, kitchens, or
living rooms. The fact that the current system doesn’t support Gen 3 Echo Dots
is a drawback for me. We were able to work around that and you can as well. The
Echo Input is a good option.
The entire install took me roughly four hours. Two of those
hours were waiting while my electrician ran the power. Another hour was
installing speakers and running speaker wire. The actual installing of the Spot
for Dot itself was 30 minutes. I would recommend the Spot for Dot.
AVNation took the next gen WAP from Pakedge out for a spin
Whether your next job is a home looking for robust network or a slate of monitoring tools you need a reliable access point. The average home has between 20 and 25 wireless devices and need the ability to get devices on and off quickly with enough throughput to satisfy everyone. Interior designers and architects have recognized the need for network, they just don’t want to “see” it. The new Pakedge WA-2200 Access Point is a good piece for the price and performance and it’s the company’s next generation of wireless products.
The Pakedge WA-2200-C access point is a low profile,
powerful network appliance. The device comes with an in-ceiling flush mount,
but you don’t have to use that mount. For a convenient hidden mount, the WA-2200
is really well done.
Installation
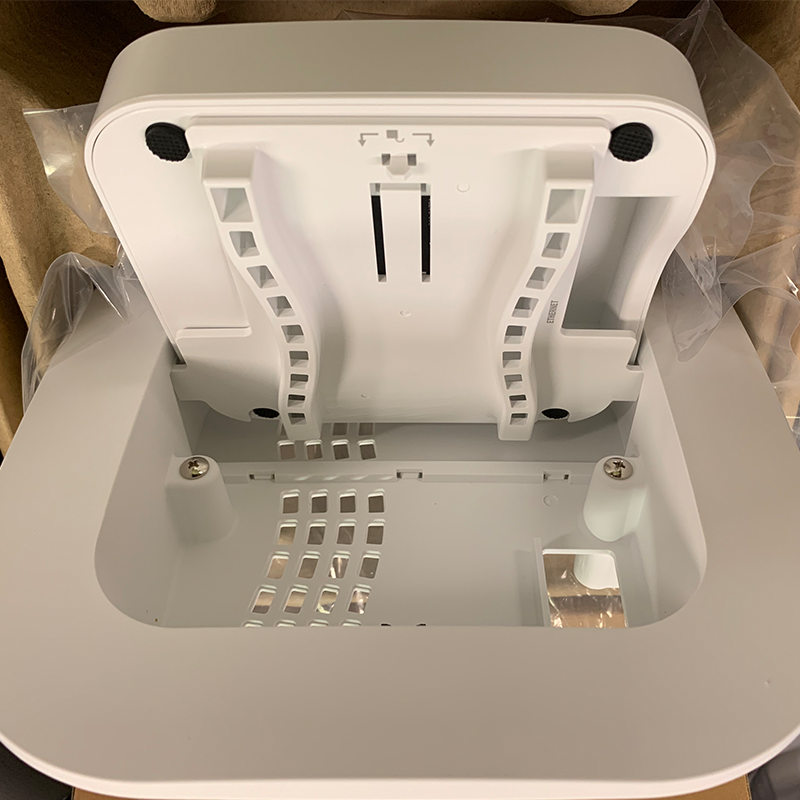
When you open the box you are greeted with the WA-2200
access point and in-ceiling mount. In addition, there is a sticker template for
you to cut the ceiling hole. Once that has been accomplished, the anchoring
tabs keeping the WA-2200-C mount in place are set by two Phillips screws. Bring
a network cable through the top and plug it in (as long as you’re running PoE)
and you are on your way.
Pakedge WA-2200 opened up
Setting up the WA-2200
Like most of the Pakedge product line, setup is based on a
web server. The WA-2200 can run on PoE, needing 12 VDC. If you can’t or don’t
want to run PoE, you can plug it into a power adapter that is sold separately.
Once there is power, login into the default IP address and within 5 minutes you
will have most of the settings done. At least that was my experience.
One small qualifier. I have been through the Control
4/Pakedge PCNA course. And passed. So my experience may be different on the
speed of setup. That being said, it was quite simple to setup. It does come
with BakPak Lite. That is Pakedge’s simplified version of BakPak. If you have a
full version of BakPak already, then you are going to want to add the WA-2200
to that.
Since I do have a BakPak account that is the route I took.
Once you have logged into the access point you head over to the Connections
section and attach the WA-2200-C to your existing BakPak. If you don’t have an
account this is where it will prompt you to add one.
The environment
This was installed and tested in a 2,000 square foot home. The
WA-2200 was placed in the bedroom area of the home so we could test how many
devices it could successfully handle at any given time. The max we had on any
given time was 12 devices. This device list is below. There was no noticeable
change in network speed or connectivity, even while streaming video to multiple
devices.
Conclusion
From a performance standpoint, the WA-2200-C is a solid
access point. The bandwidth it can push through to wireless connections is
quite impressive. I appreciate the design of the ceiling mount. Those who do
not appreciate technology don’t always want to see the tech. The ability to
hide the WA-2200 in a flush mount is well done. The setup is relatively simple,
especially if you have an existing BakPak account and have some experience with
Pakedge interfaces. If not, it might take you a bit longer. Overall, it’s a
great access point at a competitive price to other APs in the same class.
AVNation’s review of the ATEN VP2730 seamless switcher
The ATEN VP2730 is a presentation switcher. The device has seven inputs and three outputs. The outputs include 2 HDMI and an HDBaseT signal. ATEN’s VP2730 supports up to a 1080p at 60Hz signal through either the HDMI or DisplayPort inputs. It does have a streaming option but that was not tested for this review.
Upon unboxing the ATEN VP2730 the first thing to note is the
size. The switcher is a full rack wide but not quite a rack space tall. All
inputs and outputs are on the back. One note about the back of the switcher,
there is a power switch that must be flipped or you will get nothing from the device.
We used both a Sony camera as well as the ATEN 8950 HDMI
extender with a Macbook feeding it as the sources. This was so we could gauge
the effectiveness of the switching.
This may be one of the fastest seamless switchers I have
ever used. When pushing the input buttons from input 1 and input 2 were very quick.
You can watch the video below. It’s not clear quite how ATEN is able to
accomplish such fast switching but it is one of the fastest.
The setup of the ATEN VP2730 is simple and straightforward.
Like a number of signal infrastructure manufacturers, they still have support
for VGA. The 7 x 3 framework makes this device ideal for education classroom
and simple boardrooms. The PiP is a nice function but I’ve not come across an
office that uses this feature. There are plenty of use cases in education, and
there may be some companies that do employ this feature I’ve just not come
across them.
Overall the ATEN VP2730 is a solid seamless switcher. The
switching speed is incredibly impressive. With a price point of around $2,000 this
switcher would be well worth the money.